Monday, February 28, 2011

Bones, bones everywhere

So this week we worked on bones. I have to memorize all of the bones, and all of the processes, and foramen, :(. I don't like this one so much. I'll actually be adding to this later, as I want to label some of the photos. I've actually been giving out my blog links to fellow students because the pictures here are better than on FB, and it's easier than emailing everyone who wants the pictures. :)


Sunday, February 27, 2011

Herb Baked Chicken

Cymone here! Ok so yesterday I tried a new recipe since I was hankering for some form of baked chicken with herbs, preferably rosemary. Plus, not to mention, I should eat something healthy once in a while. I’m on what you call the “grad student” diet: grab whatever crap they’re selling on campus, eat once maybe twice a day, and eat tons of fast and cheap (i.e. greasy and awful for you) food.
Pictured Above: Food not available in college
So here’s the list of ingredients: 

Chicken! I used two boneless, skinless breasts that came out to 2/3 lb
Sprig of fresh rosemary (about 1 ½ tablespoons)
About ½ tablespoon fresh thyme
Salt and pepper
3 cloves fresh garlic
½ of a small lemon
About ½ cup chicken broth

So first off, feel free to use dried herbs and pre-minced garlic, just remember it's a 3:1 ratio so use 1/2 tablespoon of dry rosemary and about 1/2 teaspoon dried thyme. I just love fresh stuff when I can get it. Also, if you prefer more variety in chicken parts feel free; chicken breast just happened to be BOGO! Keep in mind this was for 2 servings so adjust accordingly. Preheat the oven to 375. With the chicken, trim off all the fat, pat dry, then season with salt and pepper on both sides. Mince the garlic and give a good chop to the rosemary and thyme and spread evenly over the chicken. You could do this for both sides, but I thought it looked pretty with all the colors on the top ^_^.
So colorful and it smells good too!
Then with half a lemon drizzle lemon juice over the chicken. A little acidity always helps, it doesn’t taste sour afterwards but it adds depth! After everything is all seasoned  place your chicken in a glass dish (Pyrex, Anchor, etc.). I had to use a way too small casserole dish thanks to my former roommate stealing all but one of my Pyrex dishes. 
Oh Pyrex, I miss you. Krista, you whore!
Bake in the oven, covered, for 10 minutes. After the 10 minutes add enough chicken broth to come halfway up the chicken (you don’t want to cover the chicken). By adding the broth you’ll have very moist chicken instead of dried out crap chicken.  Put the chicken back in the oven, uncovered, for another 10-15 minutes depending on the thickness. If you have a thermometer the internal temperature at the thickest point should be above 155 degrees. Viola! Eat it!
Eat it I say!
Since this was the first time making this dish I asked my best critic for suggestions (i.e. my boyfriend) and he had two suggestions: thinner meat and browning the meat prior to baking and I couldn’t agree more. They came out super juicy and yummy but these two tips would probably make it even more awesome. If you’re using thick chicken breasts like I did either split them widthwise or pound it down with a meat tenderizer. I typically prefer just cutting them in half, me and the meat tenderizer have been enemies ever since I made chicken kiev. And with the browning suggestion, this is just to give it a little more color and texture on the outside. Just set your stovetop to a medium-high temperature, put a little olive oil or veggie oil in the pan, and get a quick sear until there’s some color on the outside (do this after seasoning). Here’s the final product with some corn and leftover scalloped potatoes from a box. All together, it took about ½ hour. Quick and healthy (and yummy) meal!
It's so yummy!

Saturday, February 26, 2011

Friday, February 25, 2011

Tutorial # 3

Finally right? I haven't made a tutorial in a few months, and I reaaally loved this look. So here we go!
The above two photos show you the look I'm gonna lay out step by step. This was my re-do of my earlier look, below. The look below used Funhouse of Virus Insanity Eyeshadow, here-on referred to as VIE, which is the green, my own TKB color, and then Moon Spiral Attack of Persephone on the outer edge, the dark blue. In the look in this tutorial, I simply replaced Moon Spiral Attack with The World from VIE. I did this mostly because I only have a sample of MSA and I have a full size of The World and the colors were close :).


Now, as always, start with a clean face! It doesn't have to be as funny looking as the one below..

The first step I always take is putting down a base, I use a Hard Candy glitter stick. Then I used some of Candy's Foiling serum on top of that. I usually take my finger and place it at the top of the bottle, get a little bit of the serum on it, and then pat each eyelid once to try and get an even application, then I spread that evenly over the entire area that is going to have makeup. :)
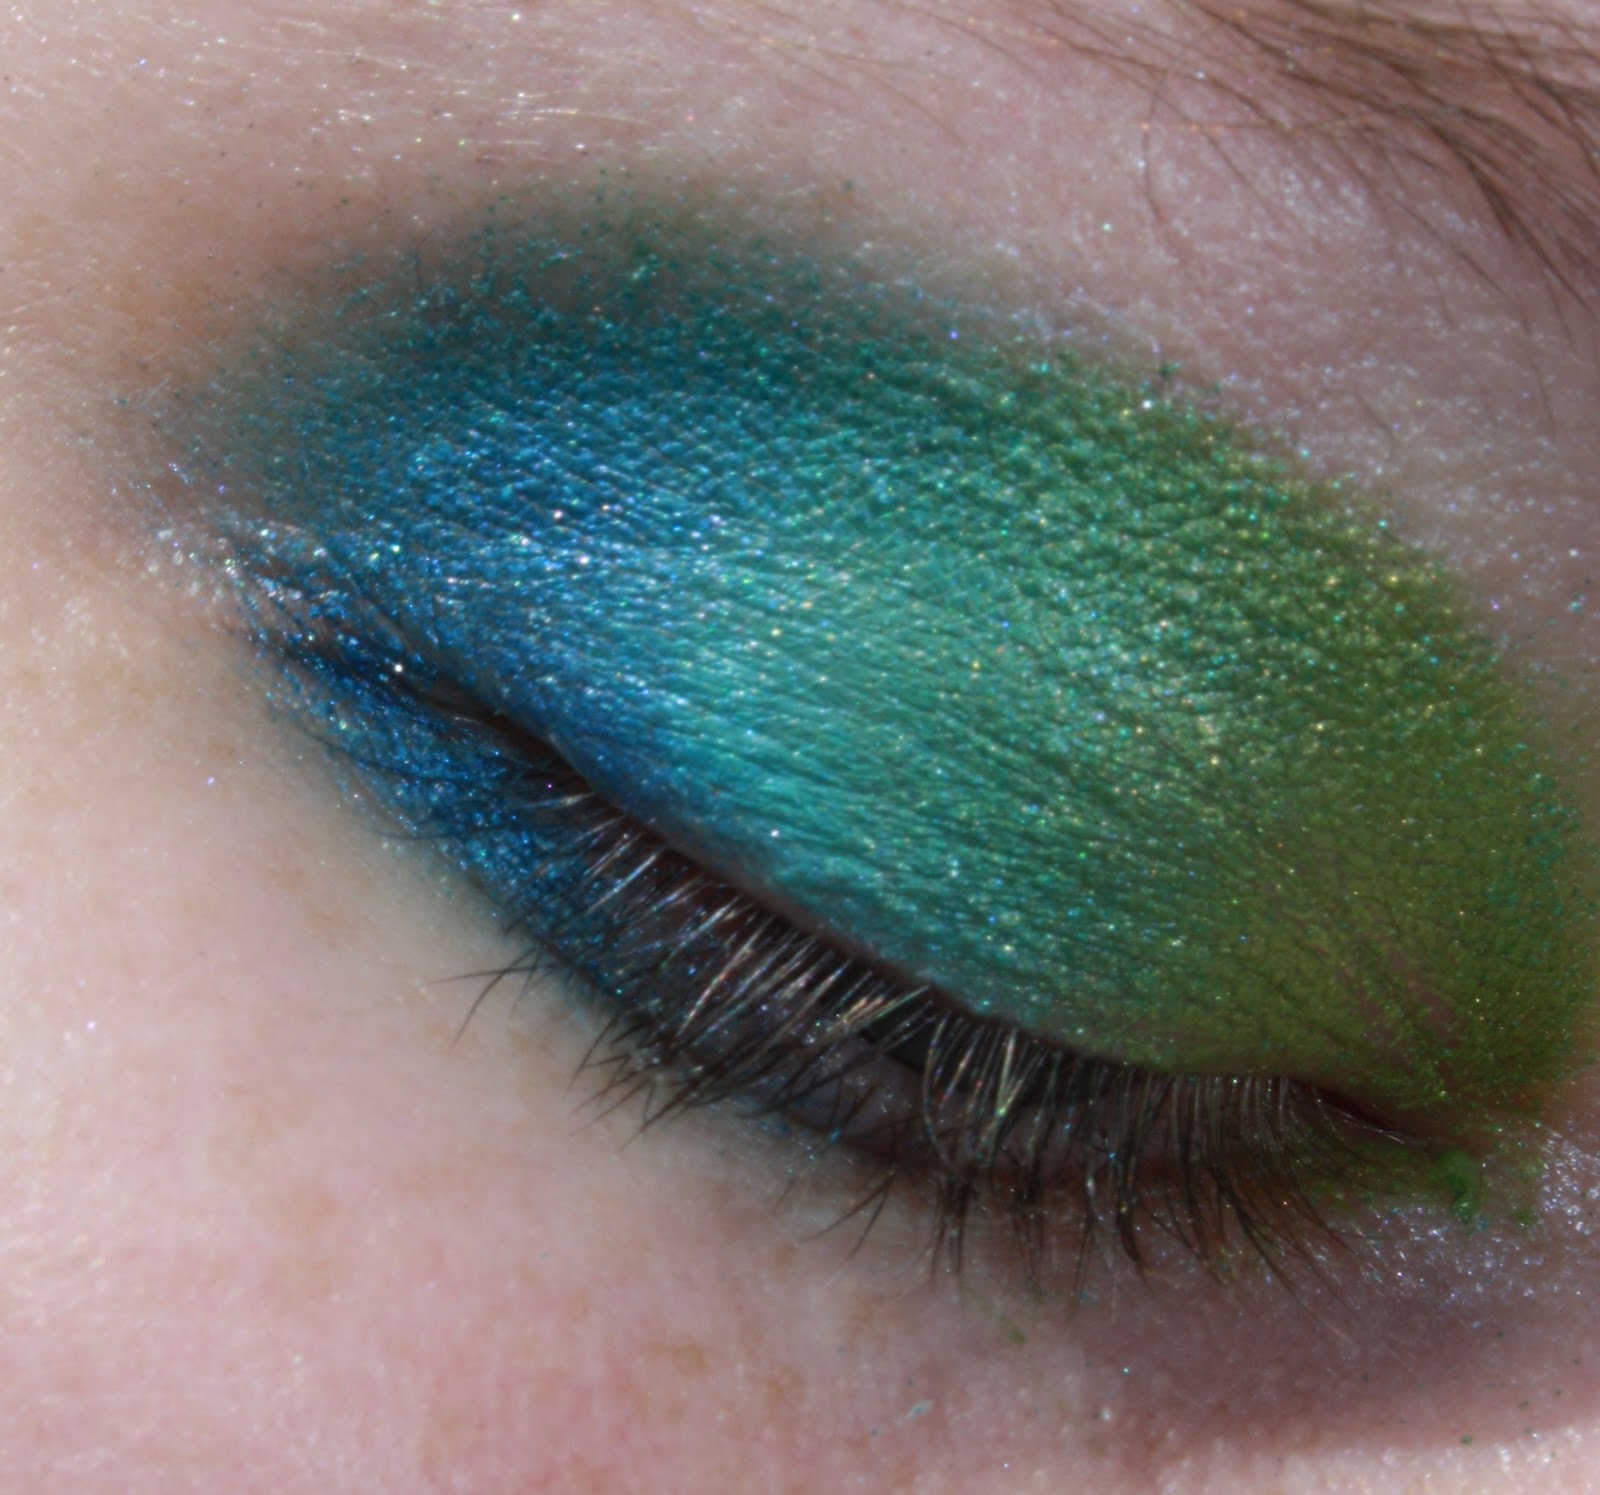
Now begins the strange shapes. I wanted this green to show up throughout the look, so I spread it in a large boomarang shape. Note that I have it creeping along my lash line, and at the top for a good length.
Here on the left side of the picture, the blue is blended in, on the right it is not. You want to take your second color and basically fill in the blank area left between your green. First pat on your color, and then on the edges, pull the colors together. For this look I pulled the color in towards my nose, so that the green was under the blue.
Same as above, blended on left, unblended on right.
A side view to show that I left a crescent space empty at the outer edge of my eye.
Then I filled in that are with The World, blending it in towards my nose again. I also brought it up over the blue and blended it into the green around the top edge of the look.  I noticed that the green extended out further on one side, so then I corrected that.


Here you can see my correction. All I did was take some of the green and applied it onto the side that had become uneven, then I blended the edges of the colors together simple by moving my brush back and forth gently where they met.
Then I added some eyeliner.


And there you have it! If anybody wants more details or has a question, feel free to ask! :)